MudLED Setup Guide
If you need help, contact us on the MudLED Facebook group here.
This is for the MudLED V2 board (black PCB). For the V1 board (blue PCB)
see here.
Below is your complete guide to the MudLED V2. If you haven’t set your MudLED up yet, please read this guide thoroughly from start to finish to avoid having issues.
First Look
Let’s take a quick look at your MudLED board and get familiar.
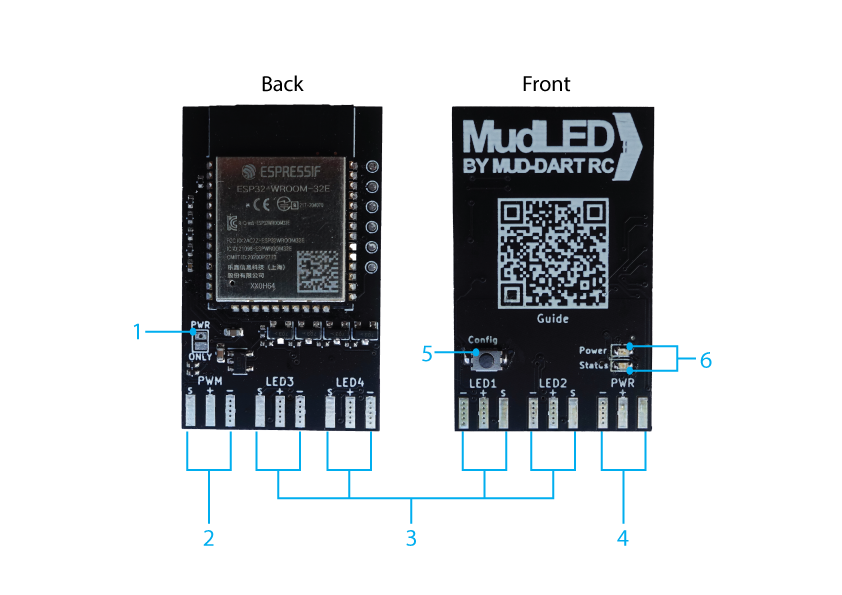
| 1 | Power Jumper. Bridging these pads with solder will mean the board is powered through the LED Power Connector (4). Read the ‘powering up’ section for details. |
| 2 | PWM Input. Connect your receiver or flight controller here to switch between LED modes. This connector will also power your MudLED board. |
| 3 | LED Strip Connectors 1-4. You can connect up to 4 LED strips here. If you’re only connecting one strip, you can connect it anywhere. |
| 4 | LED Power Connector. This will supply power to your LED strips. Read the ‘powering up’ section for details. |
| 5 | Config Button. Press and hold this to enter config mode (start the wifi). |
| 6 | Power and Status LEDs. These indicate what your MudLED is up to. See the LED status table. |
Always pay attention to the small labels above each pin and check the polarity is correct – “+” for positive voltage supply, “-” for ground, and “S” for signal. While the MudLED should survive the power being applied backwards, this is by no means guaranteed, and you will likely destroy any connected LEDs.
LED Status Table
| LED Code | Description |
|---|---|
|
|
Normal operation. Th e board is running (if you’ve enabled stealth mode, both LEDs will be off). |
|
|
Board is in config mode. You can now look for and connect to the ‘MudLED’ WiFi network. |
|
|
MudLED is updating. Please wait till this flashing sequence ends before rebooting the board. |
|
|
Board is in recovery mode. You can now look for and connect to the ‘MudLED Recovery’ WiFi network. |
What You Need
There are a few things you need before you jump in:
LED Strips
MudLED supports a number of different LED types, that are available in all of the usual places like AliExpress, Banggood, Amazon, etc. They are available in different lengths, and different number of LEDs per metre. Which LEDs you may want to buy will depend on your use-case:
- WS2812B is the ‘original’ 5V LED strip, and any LED that is broken will stop the rest of the strip from working.
- WS2813 is an updated version of WS2812B, that can handle 1 broken LED out of every 2 (2 broken in a row will still break the rest of the strip).
- WS2815 is a 12V version of the WS2813.
WS2815 is our recommendation if you are on 3S. You can then power the LEDs without a large BEC, and you will be dealing with much less current.
LED Power Supply
You need to make sure your power source can supply enough current for the LEDs.
- 5V: Allow 50mA per LED. So 100 LEDs would require a 5A BEC.
- 12V: Allow 15mA per LED. So 100 LEDs would require a 1.5A 12V supply (or 1.5A from a 3S LiPo).
This does vary between different LED makes and depends on what you are displaying (full white draws the most power). In testing 5V LEDs have drawn roughly 4.5A per 100 LEDs when all white.
You
can get away with a smaller BEC if you will never light your strip up all white, but you will need to measure your max current requirements, and Mud-Dart is not responsible if you break something.
PWM Source
MudLED allows you to switch between different LED modes using a PWM channel from your RC receiver or a flight controller.
If using your RC receiver, you can simply use a 3-pin servo extension to connect the PWM header on the MudLED to any channel on your receiver. Note that some SBUS receivers can output some PWM channels at the same time.
If your source is a flight controller, the set-up will depend on the flight controller software. But generally you can set a PWM output to “passthrough” or “RC Channel x” to enable a transmitter channel to be passed through to that output.
Once you have all of the above sorted, you can wire up your MudLED. Remember to pay attention to polarity and connect your LED strip(s), PWM source, and power.
Configure Your MudLED
A few seconds after you power on your MudLED you should be left with only the power LED lit and not flashing. The first LED on each connected strip will also flash white. If this isn’t the case for you, something’s gone wrong (troubleshooting section to come. For now just contact us).
1. Powering Up
There are two ways you can supply power to the MudLED. By default, MudLED requires separate power supplies on the PWM and PWR connectors – this is to allow using 12V LED strips when the board itself cannot run on 12V.
Separate MudLED board and LED power (default)
This is the method to use if you’re using 12V LEDs, or you want to keep your LED and board supplies separate. Just connect your LED strip power to the ‘PWR’ connector, and power for the MudLED itself to the ‘PWM’ connector (normally, you would do this by just running a 3-wire servo cable from your receiver).
Single supply for both LEDs and MudLED board (5V ONLY)
If you’d like to use a single power supply for both, you can bridge the jumper labelled ‘PWR ONLY’ on the back of the board. This will mean you only have to supply power to the ‘PWR’ connector, and not the ‘PWM’ connector.
Only use the “PWR ONLY” jumper in combination with a
5V power supply.
DOING SO WITH A 12V SUPPLY MAY DESTROY YOUR MUDLED.
Only use this jumper if you want to power both the MudLED and your LED strips from a single 5V supply – like if you are not using PWM, or if you don’t want your MudLED powered from your receiver.
If your LED strips are 12V, you MUST NOT use the “PWR ONLY” jumper on the board, and instead supply 5V power on the “PWM” pins as well.
Go ahead and plug your power supply in, and you should see the power LED on your MudLED board come on (the status LED should be off). See the LED code table for more info.
2. Connect to the WiFi
- When already powered up, hold the config button down until the status LED starts flashing. The MudLED will now create a WiFi network for you to connect to. The status LED will continue flashing while the MudLED is in configuration mode.
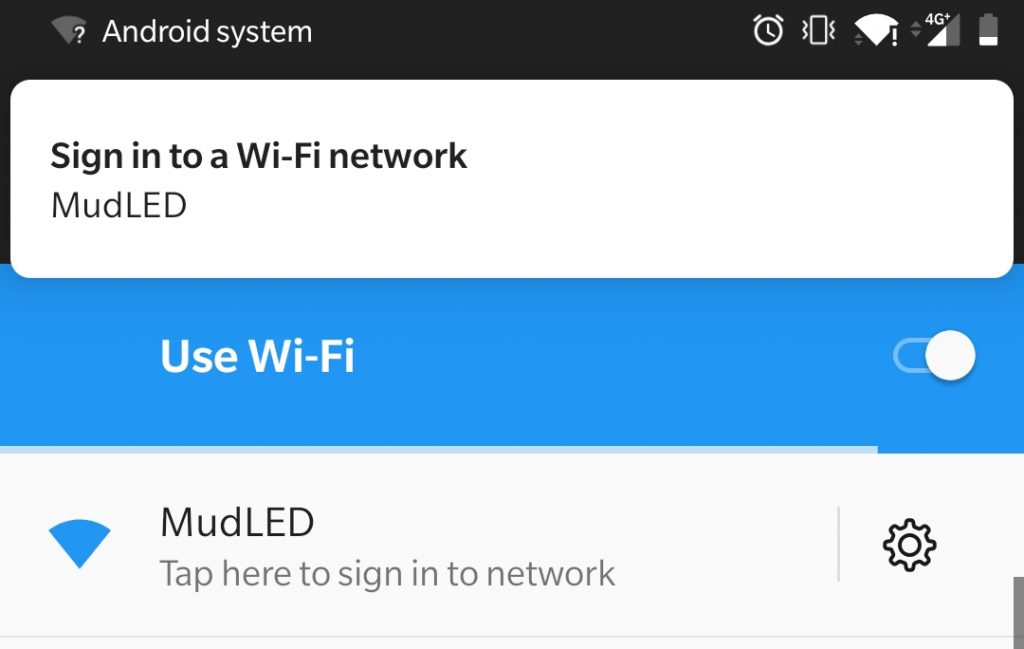
- Search for WiFi networks on your device and select the “MudLED” network.
- When you connect you may get a “Sign in” popup like in the image. If you do, clicking on it will open the configuration app. The app may also open automatically.
- If neither of these happen, you can get to the configurator by typing http://192.168.4.1 into your web browser.
3. Strip Configuration
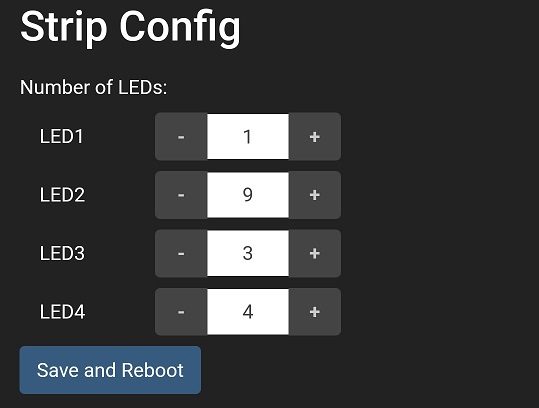
Firstly, go to the advanced page and enter the number of LEDs you have attached on each strip. If you don’t have a strip connected to one of the outputs simply set the number of LEDs to zero.
The maximum number of LEDs you can have in total is limited by the current passing through the MudLED board. For this reason, you can use more LEDs if using a 12V LED supply rather than a 5V one (because 12V LEDs draw less current). You can also disable the limit if you are e.g. supplying LED power directly and not through the MudLED.
This change requires rebooting the board, so click the “save and reboot” button. Then you’ll need to connect to the WiFi again in the same way we did in the section above.
4. Set Up a Mode
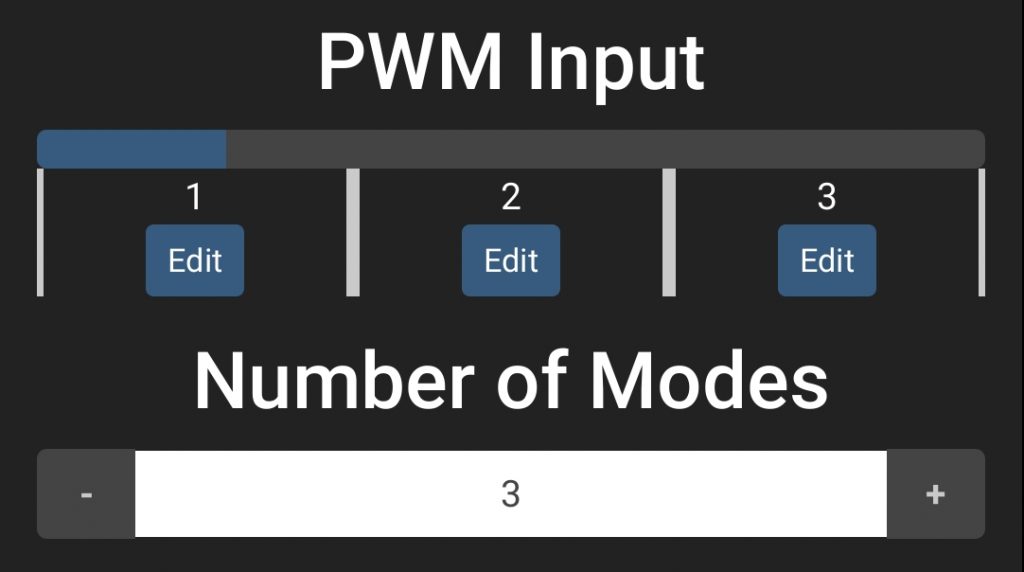
Now we can start the fun stuff! On the main page you will see a blue/grey bar divided into sections (modes). Each mode is a separate LED display, and you can switch between modes using your transmitter. You can change the number of modes available using the + and – buttons pictured. The blue/grey bar will show you the current value being received over PWM. If the value falls inside a particular mode, that mode will be activated.
Using a programmable transmitter you could change modes with a switch, rotary encoder, slider, or stick.
Once you’ve selected your desired number of modes, click “Edit” on the currently active mode to configure it. This will load the page where you will do most of your configuring from now on. You’ll be presented with a list of 16 zones which you can set up. A zone is simply an effect applied to any number of LEDs – the LEDs don’t have to be next to each other or on the same strip to be in the same zone.
Select Zone 1 to open the configuration for it, and we can begin.
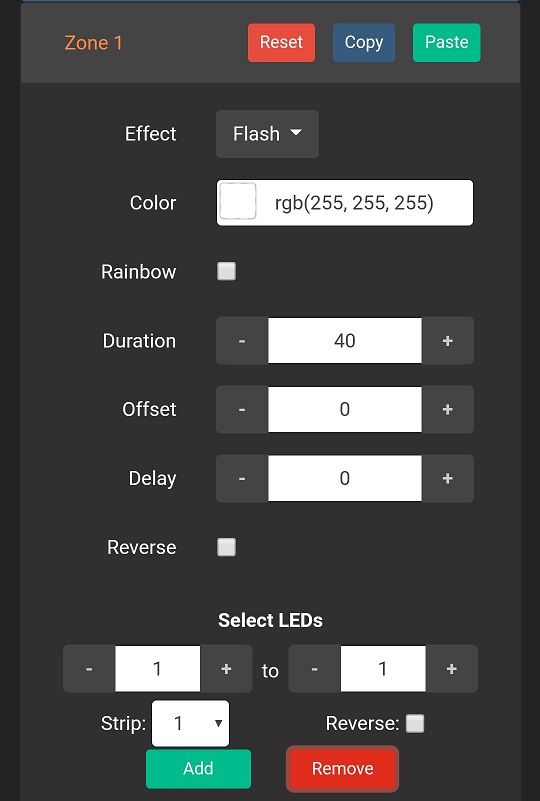
This may look complicated but it’s quite simple. Let’s break it down:
The reset, copy, and paste buttons across the top affect the whole zone. They can be used to clear the configuration for this zone, or copy it to another zone, or paste an already copied zone on top of this one.
All of the settings up to and including “Reverse” just change how the LEDs will look for this zone:
- Effect selects which LED animation you’d like.
- Color sets what color the LEDs should be for this zone.
- Rainbow will ignore the color setting and instead cycle through a rainbow.
- Duration sets how long the animation should take per loop.
- Offset changes where the animation starts. Set it to half of Duration to start in the middle.
- Delay adds a waiting period between animation cycles.
- Reverse plays the animation in reverse.
The “Select LEDs” section then lets you choose which LEDs the above effect applies to. You can add and remove ranges of LEDs using the buttons, and you can also reverse one range as compared to the others. As you make changes in this section, the LED strips will light up for a short period to show you which LEDs are selected for this zone.
Once you’re finished configuring this mode, clicking “Save” will commit it to the MudLED. You can then go back to the home page (link at the top) and select the next mode to edit.
You can assign the same LED to multiple zones. All of the assigned colors will be added together (if you assign the same LED red, green, and blue it will glow white).
Firmware Updates
NOTE: Updates will fail if your current firmware version is below v1.1.0 and your WiFi network or password contains spaces or symbols. You can use a hotspot on a phone or other device to update in this case. This bug is fixed in v1.1.0 onwards.
The current firmware version on your MudLED is shown in the bottom left corner of the screen on the advanced page.
Getting a firmware update for your MudLED is a pretty straight-forward process, and requires connecting your MudLED to an existing WiFi network with an internet connection (like your home WiFi):
- From the main page, click the ‘advanced’ button to go to the advanced page.
- Scroll down to the firmware update section.
- Select your WiFi network from the drop-down, and enter its password.
- Click ‘Update’. You’ll receive updates on the process on your device until the MudLED reboots, at which point you can close your browser. You may be disconnected at this point, as the MudLED switches to the same channel as your WiFi. This will only happen once, and you can just reconnect and go back to the advanced page (MudLED WiFi will still be on).