For discussion and to post pictures/videos of your MudLED in action, please see our RCGroups Thread.
If you have any questions you can ask on the above RCGroups thread or Contact Us.
LEDs
MudLED supports a number of different LED types, that are available in all of the usual places like AliExpress, Banggood, Amazon, etc. They are available in different lengths, and different number of LEDs per metre. Which LEDs you may want to buy will depend on your use-case:
- WS2812B is the ‘original’. 5V, and any LED that is broken will stop the rest of the strip from working.
- WS2813 is an updated version of WS2812B, that can handle 1 broken LED out of every 2 (2 broken in a row will still break the rest of the strip).
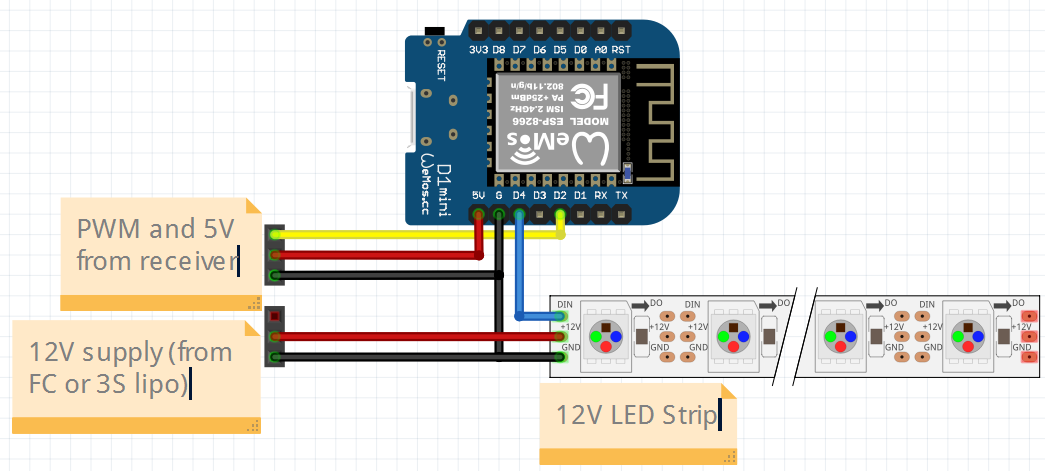
- WS2815 is a 12V version of the WS2813. I recommend these if using 3S batteries.
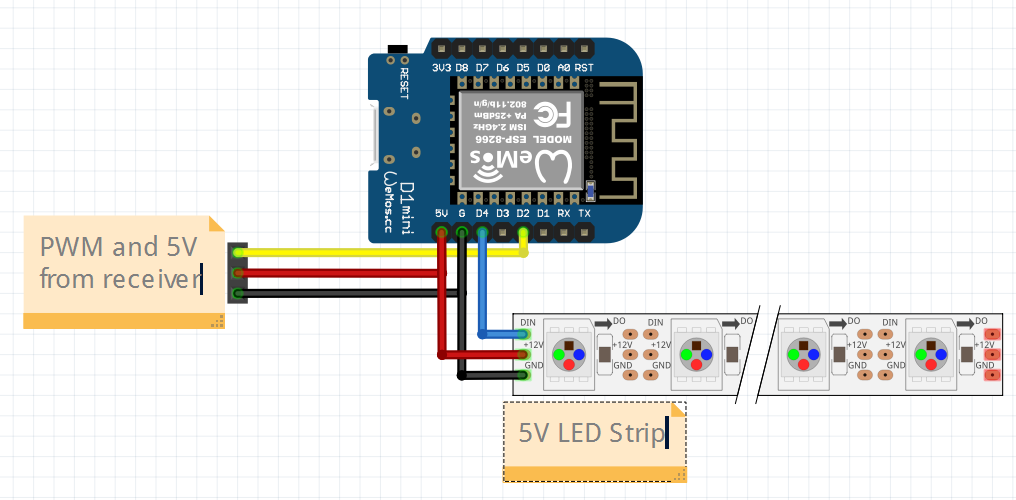
Wiring
With your MudLED in front of you, identify the following pins that you’ll need to connect:
- 5V – 5V Power
- G – Ground
- D4 – LED data out
- D2 – PWM in from receiver
OR Since version 1.6.0 you can use the board in multi-strip mode. In this mode you can attach up to 4 LED strsips to D5, D6, D7, and D8 (some extra config required, keep reading).
For testing you may want to connect servo plugs to these pins so that it’s easy to connect and disconnect your receiver and LEDs.
NOTES:
- Pay special attention to the voltage and current required by your LED strip. If your strip is 12V, you need to power your MudLED with 5V separately (it does not support 12V). However, the GND pins on the LED strip and the MudLED must be connected.
- Make sure your power source can supply enough current for the LEDs. The standard is to allow 50mA per LED. So 100 LEDs would require a 5A BEC. But this does vary between different LED makes and depends on what you are displaying (full white draws the most power). In testing 5V LEDs have drawn roughly 4A per 100 LEDs when all white.
Connecting
Your MudLED only turns the wifi on when it is configuration mode. This is to avoid interference with 2.4 Ghz radios and save battery. You can put the MudLED into configuration mode in a few ways:
- Firmware < 1.6.0 – Short the pin D7 to ground briefly with a wire
- Firmware >= 1.6.0 – Press the button on the board twice
- Cycle your PWM input between 0-100% 5 times within 5 seconds (it’s easiest to do this using a switch on your transmitter)
In either case, you will know you have successfully entered configuration mode when all connected LEDs briefly flash green.
Using your chosen device, you can now connect to a new Wifi network called "MudLED" which will not have a password. Once connected, depending on your device, the interface for MudLED may come up automatically, or you may see a popup that asks you to "sign in" or something similar. Tapping this pop-up will take you to the MudLED user interface.

If you are not prompted don’t worry. You can open any browser and type "192.168.4.1" into the address bar to connect.
Once you see the above page, you can begin to configure your MudLED.
Main Configuration
To configure multi-strip mode (firmware 1.6.0 and higher) Go to the advanced page and input the number of LEDs you have connected to each output pin. Then hit the ‘Save and Reboot’ button. You’ll need to put the board into config mode again after this.
On the main screen you will see the PWM input bar – this shows you the current PWM value that the MudLED is reading from your receiver.
Below that, the bar is divided into sections for how many modes you have configured. For each mode there will be an edit button, which you can use to configure that mode. Now is a good time to set up a transmitter switch to switch between modes and then change the number of modes on your MudLED to the number of modes your switch has.
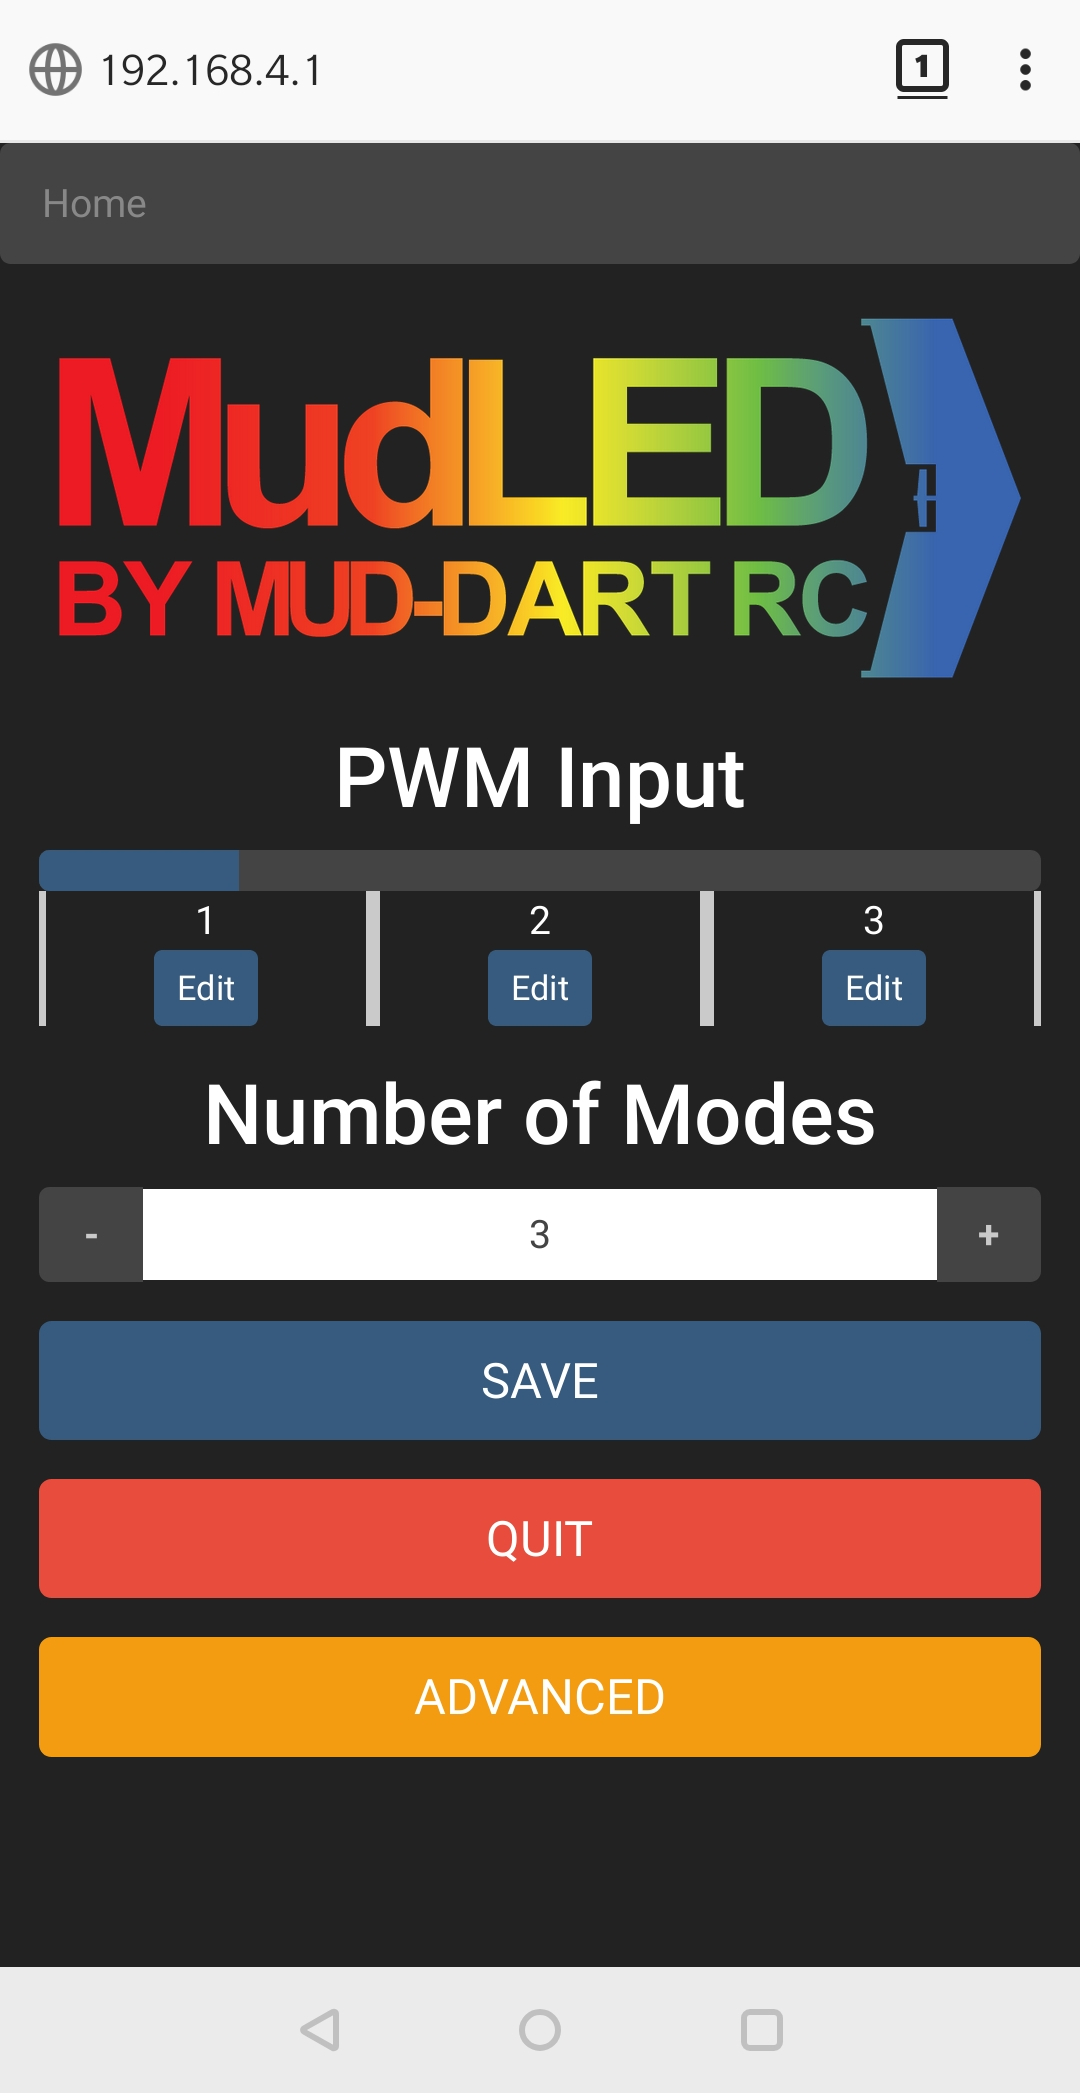
Save your changes to the number of modes, and then move your switch to activate the first mode and click the edit button.
Configure a Mode
What is a Zone?
Once on the Edit Mode page you can see a button to return to the previous page in the top left. There are also save buttons at the top and bottom of the page.
Between the save buttons are 16 configurable zones. A "zone" is a collection of LEDs that you can assign a single effect to. You can add multiple sets of LEDs to a single zone, and the effect will animate across all of the sets.
Configure a Zone
Click on the name of a zone to open the configuration for it.
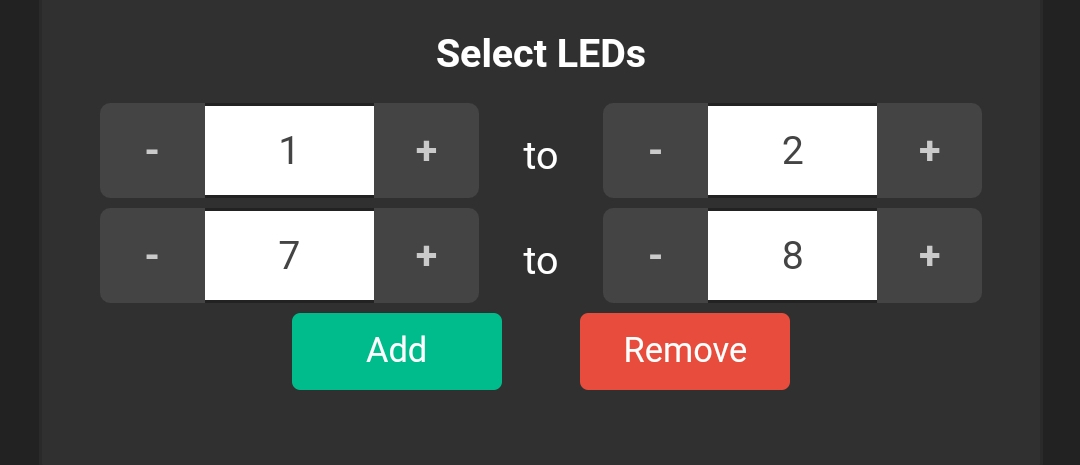
First select the range of LEDs that you want to apply an effect to. You can add and remove ranges at the bottom of the zone configuration. As you change the range beginning and end numbers, the zone will be brielfly lit up white so that you can see what you have selected.
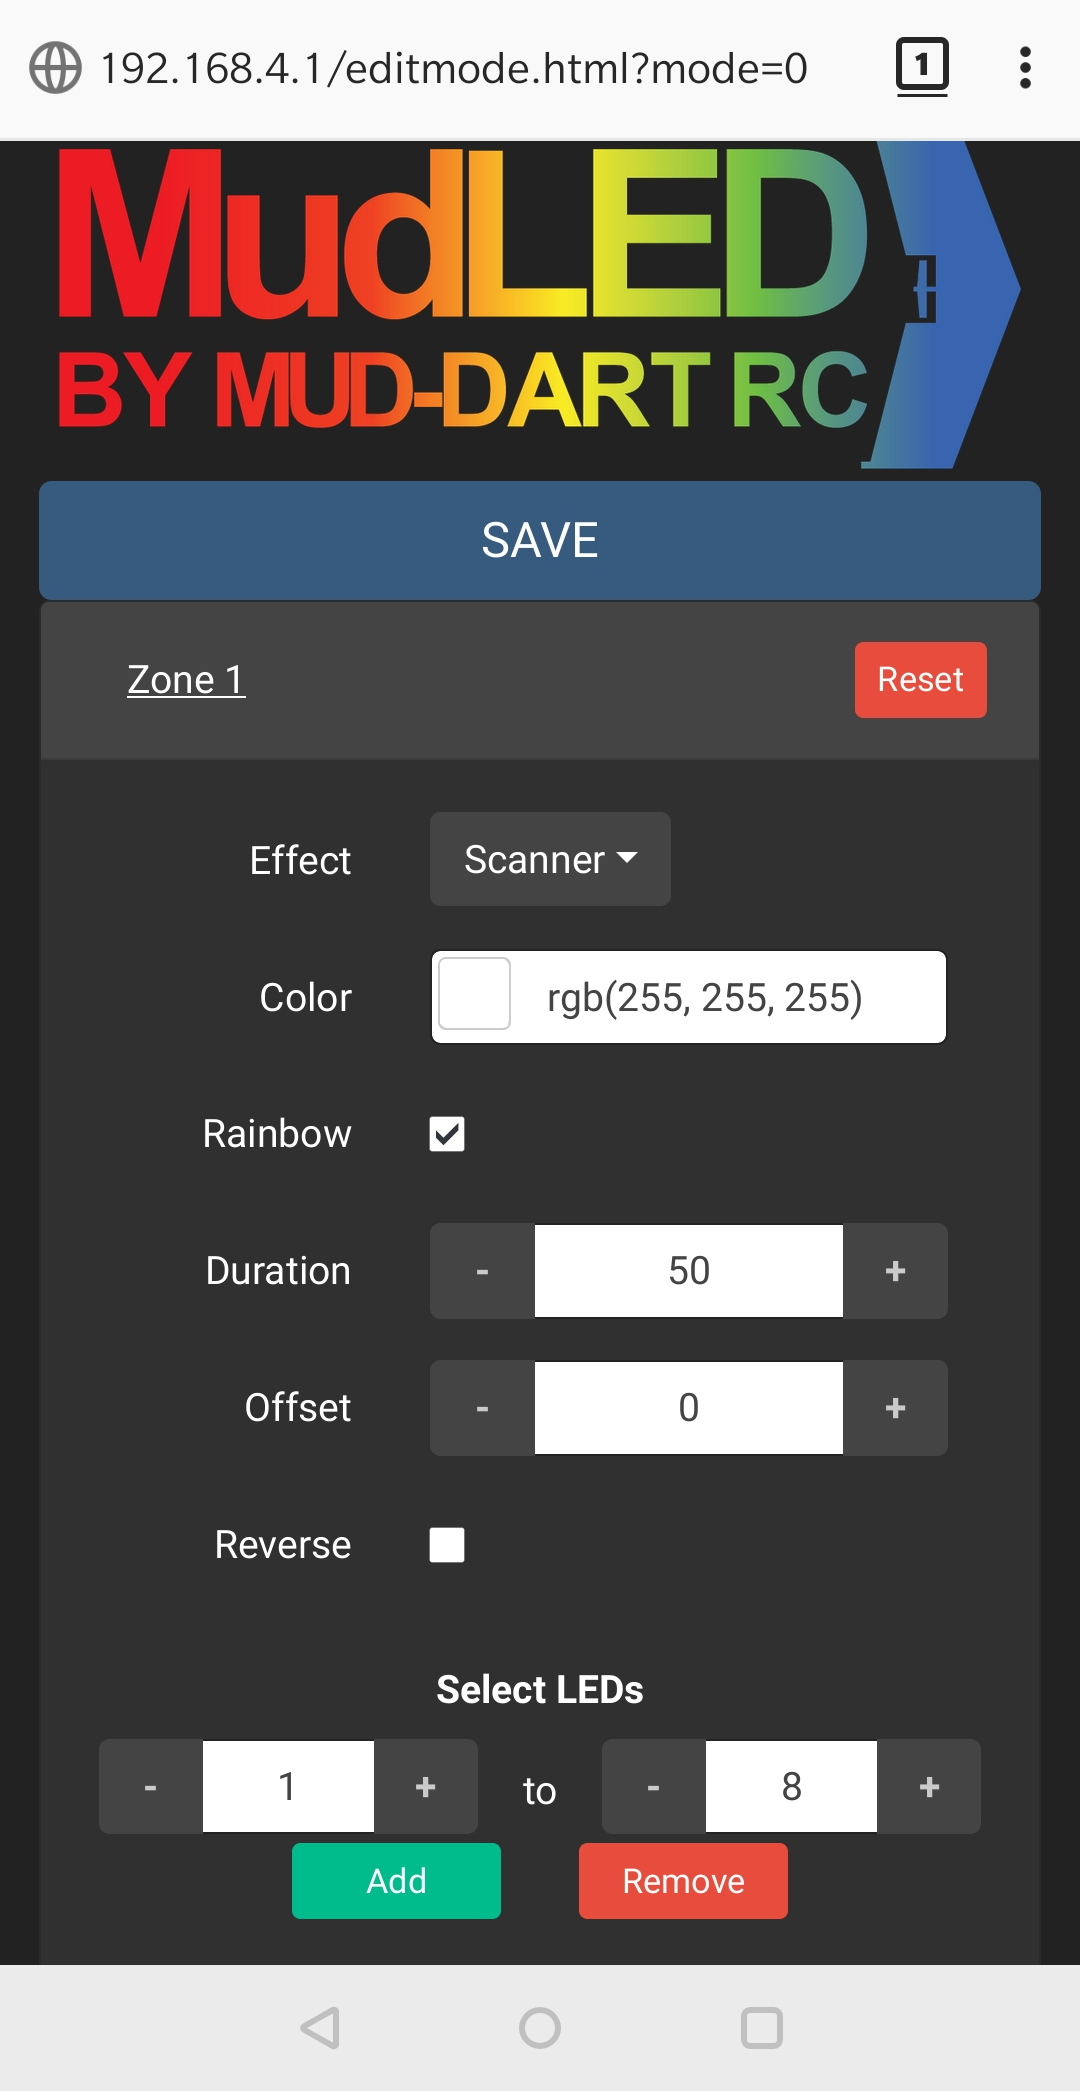
Once you’ve set your ranges, you can adjust the rest of the zone settings:
- Effect – Select an animation here. Its best to try them out and see what they do.
- Color – Click on the colored square to change the color, or type one in.
- Rainbow – If this is checked, the color setting is ignored and the color slowly fades through a rainbow.
- Duration – This is the time the animation takes to loop through. Higher numbers make the effects go slower. Set the same number on zones to sync up effects.
- Offset – This setting advances where the animation starts, up to the value of ‘duration’. To start the animation halfway through, set this to your ‘duration’ divided by 2.
- Reverse – This makes the effect run in reverse.
Once you have your zone set up how you like it you can add another one, or save it using the save button. Then click the ‘Home’ link in the top left corner of the page to go back and edit another mode, or hit the ‘Quit’ button on the main page to turn the wifi off so you can fly!
NOTE:
You can also have multiple zones use the same LEDs to overlay or blend effects together. The MudLED will ‘add’ the colors you’ve assigned together. For example if one zone is red and another on the same LEDs is green, you will get yellow. If you have 3 zones using the same LED, one red, one green, one blue, you will get white.
Firmware Update
On the main screen, click on the Advanced button. In the update section you need to enter the details of a wifi network with an internet connection (such as your home wifi). Once the update starts the LEDs will show status:
- Blue means the update is starting and wifi is connecting.
- Green means the wifi is connected and an update will start shortly.
- Red means wifi connecting failed – make sure your network name and password were correct.
No status is shown during the update process, you need to wait for the board to reboot at which point your animations will return. It should only take a minute or two. Do not remove power from the board until it has rebooted.
Starting an update will always flash the newest version of the firmware, regardless if it is newer than what you already have or not. For this reason it’s best to check the RCGroups thread to see if a newer version is available first. You can see your current version in the bottom of the advanced page.